csatblogspotdotcom

Saturday, January 21, 2017

(转)Genetic Algorithms in Plain English

转自:http://www.ai-junkie.com/ga/intro/gat1.html
作者即为AI Techniques for Game Programming一书的作者,书中3-6章(译者博客有对第三章译文 http://blog.csdn.net/zzwu/article/details/561577 以及 http://blog.csdn.net/zzwu/article/month/2005/12)对Genetic Algorithms有详细讲解,代码是C++,Windows平台
此文使用的例子十分简单,作为介绍性文章很不错(文中代码没详看)
原文是蓝色背景,字体白色,复制过来看不清时,选中即可


Genetic Algorithms in Plain English

Introduction
The aim of this tutorial is to explain genetic algorithms sufficiently for you to be able to use them in your own projects. This is a stripped-down to-the-bare-essentials type of tutorial. I'm not going to go into a great deal of depth and I'm not going to scare those of you with math anxiety by throwing evil equations at you every few sentences. In fact, I'm not going to throw any nasty equations at you at all! Not in this particular tutorial anyway...

This tutorial is designed to be read through twice... so don't worry if little of it makes sense the first time you study it.

(A reader, Daniel, has kindly translated this tutorial into German. You can find it here.)
(Another reader, David Lewin, has translated the tutorial into French. You can find it here.)

First, a Biology Lesson

Every organism has a set of rules, a blueprint so to speak, describing how that organism is built up from the tiny building blocks of life. These rules are encoded in the genes of an organism, which in turn are connected together into long strings called chromosomes. Each gene represents a specific trait of the organism, like eye colour or hair colour, and has several different settings. For example, the settings for a hair colour gene may be blonde, black or auburn. These genes and their settings are usually referred to as an organism's genotype. The physical expression of the genotype - the organism itself - is called the phenotype.

When two organisms mate they share their genes. The resultant offspring may end up having half the genes from one parent and half from the other. This process is called recombination. Very occasionally a gene may be mutated. Normally this mutated gene will not affect the development of the phenotype but very occasionally it will be expressed in the organism as a completely new trait.

Life on earth has evolved to be as it is through the processes of natural selection, recombination and mutation. To illustrate how these processes work together to produce the diverse range of flora and fauna we share our planet with let me tell you a little story....

Once upon a time there lived a species of creatures called Hooters. Hooters had evolved entirely within the darkened confines of a vast cave system hidden deep in the bowels of a mountain range. They'd had an easy life, feeling and smelling around the damp cave walls for the algae they so loved to eat, oozing between rocks and, at mating time, listening intently for the hoots of other Hooters. There were no predators in the caves, it was just the Hooters, the algae and the occasional friendly slug, so the Hooters never had anything to fear (except for maybe the occasional bad tempered Hooter). An underground river flowed through the cave system and water continuously dripped down through the water table bringing with it the fresh nutrients the algae thrived on so there was always plenty to eat and drink. However, although Hooters could feel and hear well they never had any need for eyes in the pitch blackness of the caves and as a result were totally blind. This never seemed to concern any of the Hooters though and they all had a whale of a time munching away and hooting in the darkness.

Then one day an earthquake caused part of the cave system to collapse and for the first time in many millennia the Hooters felt the warmth of sunlight upon their skin and the soft springiness of moss beneath their feet. A few daring Hooters tasted the moss and found that it was even better eating than the cave algae. "Ooooooooooh!" they hooted between mouthfuls of moss and promptly got gobbled up by the  marauding eagles who had flown in to see what all the commotion was about.

For a while it looked as though the Hooters may be hunted to extinction, for although they liked to eat the moss they could never tell if an eagle was flying above. Not only that, they couldn't even tell if they were concealed beneath a rock or not unless it was low enough to reach for with their feelers. Every day many Hooters would stumble out from the caves with the sweet smell of moss in their nostrils only to be swiftly carried away and eaten by an eagle. Their situation seemed grim indeed.

Fortunately, over the years,  the population of Hooters had grown to be enormous in the safety of the caves and enough of them were surviving to mate - after all, an eagle can only eat so much. One day, a brood of Hooters was born that shared a mutated skin cell gene. This particular gene was responsible for the development of the skin cells on their foreheads. During the development of the baby Hooters, when their skin cells grew from the mutated gene instructions they were slightly light sensitive. Each new baby Hooter could sense if something was blocking the light to its forehead or not. When these little baby Hooters grew up into bigger Hooters and ventured into the light to eat the moss they could tell if something was swooping overhead or not. So these Hooters grew up to have a slightly better chance of survival than their totally blind cousins.  And because they had a better chance of survival, they reproduced much more, therefore passing the new light sensitive skin cell gene to their offspring. After a very short while the population became dominated by the Hooters with this slight advantage.

Now let's zip a few thousand generations into the future. If you extrapolate this process over very many years and involving lots of tiny mutations occurring in the skin cell genes it's easy to imagine a process where one light sensitive cell may become a clump of light sensitive cells, and then how the interior cells of the clump may mutate to harden into a tiny lens shaped area, which would help to gather the light and focus it into one place. It's not too difficult to envision a mutation that gives rise to two of these light gathering areas thereby bestowing binocular vision upon the Hooters. This would be a huge advantage over their Cyclopsian cousins as the Hooters would now be able to judge distances accurately and have a greater field of view.

As you can see the processes of natural selection - survival of the fittest - and gene mutation have very powerful roles to play in the evolution of an organism. But how does recombination fit into the scheme of things? Well to show you that I need to tell about some other Hooters...

At around the same time the Hooters with the light sensitive cells were frolicking around in the moss and teasing the eagles, another brood of Hooters had been born who shared a mutated gene that affected their hooter. This mutation gave rise to a slightly bigger hooter than their cousins, and because it was bigger they could now hoot over longer distances. This turned out to be useful in the rapidly diminishing population because the Hooters with the bigger hooters could call out to potential mates situated far away. Not only that but the female Hooters began to show a slight preference to males with larger hooters . The upshot of this of course was that the better endowed Hooters stood a much better chance of mating than any not so well off Hooters. Over a period of time, large hooters became prevalent in the population.

Then one fine day a female Hooter with the gene for light sensitive skin cells met a male Hooter with the gene for producing huge hooters. They fell in love, and shortly afterwards produced a brood of lovely baby Hooters. Now, because the babies chromosomes were a recombination of both parents chromosomes, some of the babies shared both the special genes and grew up not only to have light sensitive skin cells, but huge hooters too! These new offspring were extremely good at avoiding the eagles and reproducing so the process of evolution began to favour them and once again this new improved type of Hooter became dominant in the population.

And so on. And so on...

Genetic Algorithms are a way of solving problems by mimicking the same processes mother nature uses. They use the same combination of selection, recombination and mutation to evolve a solution to a problem. Neat huh? Turn the page to find out exactly how it's done.


1   2   3   Home 


The Genetic Algorithm - a brief overview

Before you can use a genetic algorithm to solve a problem, a way must be found of encoding any potential solution to the problem. This could be as a string of real numbers or, as is more typically the case, a binary bit string. I will refer to this bit string from now on as the chromosome. A typical chromosome may look like this:

10010101110101001010011101101110111111101

(Don't worry if non of this is making sense to you at the moment, it will all start to become clear shortly. For now, just relax and go with the flow.)
At the beginning of a run of a genetic algorithm a large population of random chromosomes is created. Each one, when decoded will represent a different solution to the problem at hand. Let's say there are N chromosomes in the initial population. Then, the following steps are repeated until a solution is found
  • Test each chromosome to see how good it is at solving the problem at hand and assign a fitness score accordingly. The fitness score is a measure of how good that chromosome is at solving the problem to hand.
  • Select two members from the current population. The chance of being selected is proportional to the chromosomes fitness. Roulette wheel selection is a commonly used method.
  • Dependent on the crossover rate crossover the bits from each chosen chromosome at a randomly chosen point.
  • Step through the chosen chromosomes bits and flip dependent on the mutation rate.
  • Repeat step 2, 3, 4 until a new population of members has been created.

Tell me about Roulette Wheel selection


This is a way of choosing members from the population of chromosomes in a way that is proportional to their fitness. It does not guarantee that the fittest member goes through to the next generation, merely that it has a very good chance of doing so. It works like this:

Imagine that the population’s total fitness score is represented by a pie chart, or roulette wheel. Now you assign a slice of the wheel to each member of the population. The size of the slice is proportional to that chromosomes fitness score. i.e. the fitter a member is the bigger the slice of pie it gets. Now, to choose a chromosome all you have to do is spin the ball and grab the chromosome at the point it stops.

What's the Crossover Rate?


This is simply the chance that two chromosomes will swap their bits. A good value for this is around 0.7.  Crossover is performed by selecting a random gene along the length of the chromosomes and swapping all the genes after that point.

e.g. Given two chromosomes

10001001110010010
01010001001000011

Choose a random bit along the length, say at position 9, and swap all the bits after that point

so the above become:

10001001101000011
01010001010010010


What's the Mutation Rate?


This is the chance that a bit within a chromosome will be flipped (0 becomes 1, 1 becomes 0). This is usually a very low value for binary encoded genes, say 0.001

So whenever chromosomes are chosen from the population the algorithm first checks to see if crossover should be applied and then the algorithm iterates down the length of each chromosome mutating the bits if applicable.


1   2   3   Home


From Theory to Practice


To hammer home the theory you've just learnt let's look at a simple problem:

Given the digits 0 through 9 and the operators +, -, * and /,  find a sequence that will represent a given target number. The operators will be applied sequentially from left to right as you read.

So, given the target number 23, the sequence 6+5*4/2+1 would be one possible solution.

If  75.5 is the chosen number then 5/2+9*7-5 would be a possible solution.

Please make sure you understand the problem before moving on. I know it's a little contrived but I've used it because it's very simple.


Stage 1: Encoding


First we need to encode a possible solution as a string of bits… a chromosome. So how do we do this? Well, first we need to represent all the different characters available to the solution... that is 0 through 9 and +, -, * and /. This will represent a gene. Each chromosome will be made up of several genes.

Four bits are required to represent the range of characters used:

0:         0000
1:         0001
2:         0010
3:         0011
4:         0100
5:         0101
6:         0110
7:         0111
8:         1000
9:         1001
+:         1010
-:          1011
*:          1100
/:          1101

The above show all the different genes required to encode the problem as described. The possible genes 1110 & 1111 will remain unused and will be ignored by the algorithm if encountered.

So now you can see that the solution mentioned above for 23, ' 6+5*4/2+1' would be represented by nine genes like so:

0110 1010 0101 1100 0100 1101 0010 1010 0001

6        +        5        *        4         /        2        +       1

These genes are all strung together to form the chromosome:

 011010100101110001001101001010100001

A Quick Word about Decoding

Because the algorithm deals with random arrangements of bits it is often going to come across a string of bits like this:

0010001010101110101101110010

Decoded, these bits represent:

0010 0010 1010 1110 1011 0111 0010

2        2        +        n/a     -        7        2

Which is meaningless in the context of this problem! Therefore, when decoding, the algorithm will just ignore any genes which don’t conform to the expected pattern of: number -> operator -> number -> operator …and so on. With this in mind the above ‘nonsense’ chromosome is read (and tested) as:

2   +   7


Stage 2: Deciding on a Fitness Function


This can be the most difficult part of the algorithm to figure out. It really depends on what problem you are trying to solve but the general idea is to give a higher fitness score the closer a chromosome comes to solving the problem.  With regards to the simple project I'm describing here, a fitness score can be assigned that's inversely proportional to the difference between the solution and the value a decoded chromosome represents.

If we assume the target number for the remainder of the tutorial is 42, the chromosome mentioned above

011010100101110001001101001010100001

has a fitness score of 1/(42-23) or 1/19.

As it stands, if a solution is found, a divide by zero error would occur as the fitness would be 1/(42-42). This is not a problem however as we have found what we were looking for... a solution. Therefore a test can be made for this occurrence and the algorithm halted accordingly.
  

Stage 3: Getting down to business


First, please read this tutorial again.

If you now feel you understand enough to solve this problem I would recommend trying to code the genetic algorithm yourself. There is no better way of learning. If, however, you are still confused, I have already prepared some simple code which you can find here. Please tinker around with the mutation rate, crossover rate, size of chromosome etc to get a feel for how each parameter effects the algorithm. Hopefully the code should be documented well enough for you to follow what is going on! If not please email me and I’ll try to improve the commenting.

Note: The code given will parse a chromosome bit string into the values we have discussed and it will attempt to find a solution which uses all the valid symbols it has found. Therefore if the target is 42, + 6 * 7 / 2 would not give a positive result even though the first four symbols("+ 6 * 7") do give a valid solution.

(Delphi code submitted by Asbjørn can be found here and Java code submitted by Tim Roberts can be found here)

Last Words

I hope this tutorial has helped you get to grips with the basics of genetic algorithms. Please note that I have only covered the very basics here. If you have found genetic algorithms interesting then there is much more for you to learn. There are different selection techniques to use, different crossover and mutation operators to try and more esoteric stuff like fitness sharing and speciation to fool around with. All or some of these techniques will improve the performance of your genetic algorithms considerably.

Stuff to Try 

If you have succeeded in coding a genetic algorithm to solve the problem given in the tutorial, try having a go at the following more difficult problem:

Given an area that has a number of non overlapping disks scattered about its surface as shown in Screenshot 1,
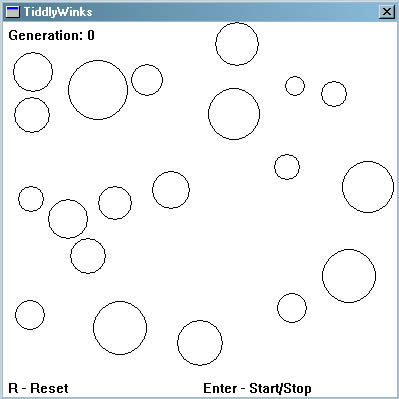
Screenshot 1

Use a genetic algorithm to find the disk of largest radius which may be placed amongst these disks without overlapping any of them. See Screenshot 2.
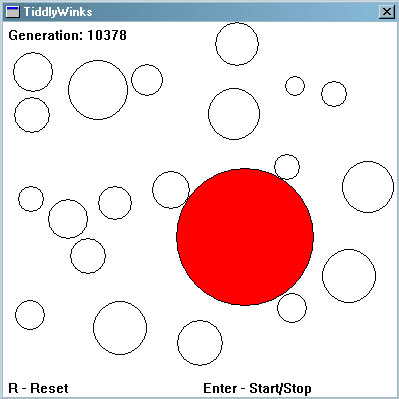
Screenshot 2

As you may have already gathered, I've already written some code that solves this problem so if you get stuck you can find it here. (but you will have a go yourself first eh? ;0)). For those of you without compilers, you can get the executable file here.


1   2   3   Home


Labels: , , ,

Friday, January 20, 2017

(转)Neural Networks in Plain English

Neural Networks in Plain English,作者网站上的一篇入门介绍,原文:
http://www.ai-junkie.com/ann/evolved/nnt1.html
同 AI Techniques for Game Programming 一书的第七章(内容略有丰富,译者博客上有第七章译文 http://blog.csdn.net/zzwu/article/details/574931/ 以及 http://blog.csdn.net/zzwu/article/details/564030),通俗易懂,代码部分没细看,是Windows平台上C++。
原文是蓝色背景,字体白色,复制的时候背景没过来,所以下文中部分没显示出来,选中即可看见


Introduction

I have been interested in artificial intelligence and artificial life for years and I read most of the popular books printed on the subject. I developed a grasp of most of the topics yet neural networks always seemed to elude me. Sure, I could explain their architecture but as to how they actually worked and how they were implemented… well that was a complete mystery to me, as much magic as science. I bought several books on the subject but every single one attacked the subject from a very mathematical and academic viewpoint and very few even gave any practical uses or examples. So for a long long time I scratched my head and hoped that one day I would be able to understand enough to experiment with them myself.

That day arrived some time later when - sat in a tent in the highlands of Scotland reading a book - I had a sudden blast of insight. It was one of those fantastic “eureka” moments and although Scotland is a beautiful place I couldn’t wait to get to a computer so I could try out what I’d just learnt. To my surprise the first neural net I programmed worked perfectly and I haven’t looked back since. I still have a great deal to learn, neural nets are a huge subject, but I hope I can share enough knowledge and enthusiasm to get you started on your own little projects. In many ways the fields of AI and A-Life are very exciting to work in. I think of these subjects as the explorers of old must have looked at all those vast empty spaces on the maps. There is so much to learn and discover.


I’ll start off by describing what a neural net actually is and what it’s architecture is, then I’ll do a little theory on how we get it to perform for us but I’ll try to use as little maths as possible. (Having some understanding of mathematics is impossible to avoid however and the deeper you get into this topic the more mathematics you are going to have to learn). Finally, we’ll get to the fun bit. I’ll come up with a little project I will program and take you through one step at a time. It will be in this last phase of the tutorial where I hope you get the same “eureka” feeling for neural nets as I did back in rainy old Scotland. Until then just sit back, absorb and be patient.

The C++ source code for the tutorial and a pre-compiled executable can be found here.

Update: A reader, Sam Corder, has converted the code into VB NET. You can download his source and executable here.
Update: A reader, Chris Reitzel, has converted the code into DELPHI. You can download his source and executable here.


2  3  4  5  6  7  8  Next  Home


So, what exactly is a Neural Network?

A neural network is mans crude way of trying to simulate the brain electronically. So to understand how a neural net works we first must have a look at how the old grey matter does its business…

Our brains are made up of about 100 billion tiny units called neurons. Each neuron is connected to thousands of other neurons and communicates with them via electrochemical signals. Signals coming into the neuron are received via junctions called synapses, these in turn are located at the end of branches of the neuron cell called dendrites. The neuron continuously receives signals from these inputs and then performs a little bit of magic. What the neuron does (this is over simplified I might add) is sum up the inputs to itself in some way and then, if the end result is greater than some threshold value, the neuron fires. It generates a voltage and outputs a signal along something called an axon. Don't worry too much about remembering all these new words as we won’t be using many of them from this moment onwards, just have a good look at the illustration and try to picture what is happening within this simple little cell.


Thanks to whoever drew this picture. I hope I haven’t offended you by using it


Neural networks are made up of many artificial neurons. An artificial neuron is simply an electronically modelled biological neuron. How many neurons are used depends on the task at hand. It could be as few as three or as many as several thousand. One optimistic researcher has even hard wired 2 million neurons together in the hope he can come up with something as intelligent as a cat although most people in the AI community doubt he will be successful (Update: he wasn't!). There are many different ways of connecting  artificial neurons together to create a neural network but I shall be concentrating on the most common which is called a feedforward network. So, I guess you are asking yourself, what does an artificial neuron look like? Well here you go:


Each input into the neuron has its own weight associated with it illustrated by the red circle. A weight is simply a floating point number and it's these we adjust when we eventually come to train the network. The weights in most neural nets can be both negative and positive, therefore providing excitory or inhibitory influences to each input. As each input enters the nucleus (blue circle) it's multiplied by its weight. The nucleus then sums all these new input values which gives us the activation (again a floating point number which can be negative or positive). If the activation is greater than a threshold value - lets use the number 1 as an example - the neuron outputs a signal. If the activation is less than 1 the neuron outputs zero. This is typically called a step function (take a peek at the following diagram and have a guess why).


1  3  4  5  6  7  8  Next  Home


Now for some maths

I now have to introduce you to some equations. I’m going to try to keep the maths down to an absolute minimum but it will be useful for you to learn some notation.  I’ll feed you the maths little by little and introduce new concepts when we get to the relevant sections. This way I hope your mind can absorb all the ideas a little more comfortably and you'll be able to see how the maths are put to work at each stage in the development of a neural net.

A neuron can have any number of inputs from one to n, where n is the total number of inputs. The inputs may be represented  therefore as x1, x2, x3… xn. And the corresponding weights for the inputs as w1, w2, w3… wn. Now, the summation of the weights multiplied by the inputs we talked about above can be written as x1w1 + x2w2 + x3w3 …. + xnwn,  which I hope you remember is the activation value. So…

a = x1w1+x2w2+x3w3... +xnwn
  
Fortunately there is a quick way of writing this down which uses the Greek capital letter sigma Swhich is the symbol used by mathematicians to represent summation.
Maybe just to clarify what this means I should write it out in code. Assuming an array of inputs and weights are already initialized as x[n] and w[n] then:

double activation = 0;

for (int i=0; i
{
   activation += x[i] * w[i];
}

Got it? Now remember that if the activation > threshold we output a 1 and if activation < threshold we output a 0.

Let me illustrate everything I've shown you so far with a diagram.


Please ensure that you understand exactly how to calculate the activation value before you move on.


1  2  4  5  6  7  8  Next  Home


I understand all that but how do you actually use an artificial neuron?

Well, we have to link several of these neurons up in some way. One way of doing this is by organising the neurons into a design called a feedforward network. It gets its name from the way the neurons in each layer feed their output forward to the next layer until we get the final output from the neural network. This is what a very simple feedforward network looks like:


Each input is sent to every neuron in the hidden layer and then each hidden layer’s neuron’s output is connected to every neuron in the next layer. There can be any number of hidden layers within a feedforward network but one is usually enough to suffice for most problems you will tackle. Also the number of neurons I've chosen for the above diagram was completely arbitrary. There can be any number of neurons in each layer, it all depends on the problem. By now you may be feeling a little dazed by all this information so I think the best thing I can do at this point would be to give you a real world example of how a neural net can be used in the hope that I can get your very own brain’s neurons firing!

You probably know already that a popular use for neural nets is character recognition. So let's design a neural network that will detect the number '4'. Given a panel made up of a grid of lights which can be either on or off, we want our neural net to let us know whenever it thinks it sees the character '4'. The panel is eight cells square and looks like this:


We would like to design a neural net that will accept the state of the panel as an input and will output either a 1 or zero. A 1 to indicate that it thinks the character ‘4’ is being displayed and 0 if it thinks it's not being displayed. Therefore the neural net will have 64 inputs, each one representing a particular cell in the panel and a hidden layer consisting of a number of neurons (more on this later) all feeding their output into just one neuron in the output layer. I hope you can picture this in your head because the thought of drawing all those little circles and lines for you is not a happy one .

Once the neural network has been created it needs to be trained. One way of doing this is initialize the neural net with random weights and then feed it a series of inputs which represent, in this example, the different panel configurations. For each configuration we check to see what its output is and adjust the weights accordingly so that whenever it sees something looking like a number 4 it outputs a 1 and for everything else it outputs a zero. This type of training is called supervised learning and the data we feed it is called a training set. There are many different ways of adjusting the weights, the most common for this type of problem is called backpropagation. I will not be going into backprop in this tutorial as I will be showing you a completely different way of training neural nets which requires no supervision whatsoever (and hardly any maths - woohoo!)

If you think about it, you could increase the outputs of this neural net to 10.  This way the network can be trained to recognize all the digits 0 through to 9. Increase them further and it could be trained to recognize the alphabet too!

Are you starting to get a feel for neural nets now? I hope so. But even if you’re not all that will hopefully change in a moment when you start to see some code.


1  2  3  5  6  7  8  Next  Home


So, what’s our project going to be fup?

We are going to evolve virtual minesweepers to find and collect land-mines scattered about a very simple 2D world. ( In the original version of this tutorial the program evolved ants that collected food but I fancied a change. ;0) )

This is a screenshot of the application:


As you can see it's a very simple display. The minesweepers are the things that look like tanks and the land-mines are represented by the green dots. Whenever a minesweeper finds a mine it is removed and another mine is randomly positioned somewhere else in the world, thereby ensuring there is always a constant amount of land-mines on display. The minesweepers drawn in red are the best performing minesweepers the program has evolved so far.

How is a neural net going to control the movement of a minesweeper? Well, just like the control of a real tank, the minesweepers are controlled by adjusting the speed of a left track and a right track. By applying various forces to the left and right side of a minesweeper we can give it a full range of movement. So the network requires two outputs, one to designate the speed of the left track, and the other to designate the speed of the right track.

The more thoughtful of you may be wondering how on earth we can apply varying forces when all we've discussed so far are binary networks outputting 1’s and 0’s. The secret to this is that instead of using a simple step (threshold) activation function we use one which softens the output of each neuron to produce a symmetrical curve. There are several functions which will do this and we are going to use one called the sigmoid function. (sigmoid, or sigmoidal is just a posh way of saying something is S shaped)
This equation may look intimidating to some of you but it’s very simple really. The e is a mathematical constant which approximates to 2.7183, the a is the activation into the neuron and p is a number which controls the shape of the curve. p is usually set to 1.0.

This function is terrific and comes in handy for all sorts of different uses because  it produces an output like this:


The lower the value of p the more the curve begins to look like a step function. Also please note this curve is always centred around 0.5. Negative activation values produce a result less than 0.5, positive activation values produce a result greater than 0.5.

Therefore, to obtain a continuously graded output between 0 and 1 from our neurons we just have to put the sum of all the inputs x weights through the sigmoid function and Bob’s your uncle! So that’s our outputs dealt with, what about the inputs?

I have chosen to have four inputs. Two of them represent a vector pointing to the closest land-mine and the other two represent the direction the minesweeper is pointing. I call this vector, the minesweepers look-at vector.  These four inputs give the minesweeper's brain - its neural network - everything it needs to know to figure out how to orient itself towards the mines.


Now we have defined our inputs and our outputs what about the hidden layer/s? How do we decide how many layers we should have and how many neurons we should have in each layer? Well, this is a matter of guesswork and something you will develop a ‘feel’ for. There is no known rule of thumb although plenty of researchers have tried to come up with one. By default the simulation uses one hidden layer that contains six neurons although please spend some time experimenting with different numbers to see what effect they may have. I’d like to emphasise here that the more you play around with all the parameters the better the ‘feel’ you are going to develop and the better your neural networks will be.

Time to look at some code now. Here's a quick breakdown of the important classes.

CNeuralNet is the neural net class (surprise surprise).

CGenAlg is the genetic algorithm class.

CMineSweeper is a data and controller class for each minesweeper.

CController is the controller class which ties all the other classes together.

CParams is a class which loads in all the parameters for the application. They can be found in the file 'params.ini'. I strongly suggest you play around with the settings in this file when you start to play around with the code.


1  2  3  4  6  7  8  Next  Home


The CNeuralNet class

Let’s get started on the neural network class, CNeuralNet. We want this class to be flexible so it can be used in other projects and as simple to use as possible. We need to be able to set up a neural network with any amount of inputs and outputs and any amount of neurons in any amount of hidden layers.  So how do we do this? Well, first we need to define structures for a neuron and a neuron layer. Let’s have a look at the definition of these structures… first the neuron:

struct SNeuron{
   //the number of inputs into the neuron
   int m_NumInputs;

   //the weights for each input
   vector m_vecWeight;
   //ctor
   SNeuron(int NumInputs);
};

This is very simple, we just need to keep a record of how many inputs there are into each neuron and a std::vector of doubles in which we will store all the weights. Remember, there's a weight for every input into the neuron. When a SNeuron object is created, all the weights are initialized with random values.

This is the constructor for SNeuron:
SNeuron::SNeuron(int NumInputs): m_NumInputs(NumInputs+1){
  //we need an additional weight for the bias hence the +1
  for (int i=0; i
  {
    //set up the weights with an initial random value
    m_vecWeight.push_back(RandomClamped());
  }
}

This takes the number of inputs going into the neuron as an argument and creates a vector of random weights. One weight for each input.

What’s that I hear you say? There’s an extra weight there! Well I’m glad you spotted that because that extra weight is quite important but to explain why it’s there I’m going to have to do some more maths. Remember that our activation was the sum of all the inputs x weights and that the output of the neuron was dependent upon whether or not this activation exceeded a threshold value (t)? And that this could be represented in equation form by

x1w1 + x2w2 + x3w3… + xnwn >= t

Because the network weights are going to be evolved it would be great if the threshold value could be evolved too. To make this easy I'm going to use a little trick to make it appear as a weight. All you have to do is subtract t from either side of the equation and we get:

x1w1 + x2w2 + x3w3… + xnwn – t >= 0

or we can write this another way:

x1w1 + x2w2 + x3w3… + xnwn + (-1)t >= 0

So you can see (hopefully) that we can treat the threshold as a weight that is always multiplied by an input of -1. This is usually referred to as the bias.

And that's why each neuron is initialized with one additional weight. Because now when the network is evolved we don’t have to worry about the threshold value as it's built in with the weights and will take care of itself. Good eh?

Lets get on with the rest of the neural net code… The next structure defines a layer of neurons.

struct SNeuronLayer{
  //the number of neurons in this layer
  int m_NumNeurons;

  //the layer of neurons
  vector m_vecNeurons;

  SNeuronLayer(int NumNeurons, int NumInputsPerNeuron);
};

As you can see this just groups together a bunch of neurons into a layer. The CNeuralNet class is much more exciting, so let's move on and take a look at its definition:

class CNeuralNet{
private:

  int m_NumInputs;

  int m_NumOutputs;

  int m_NumHiddenLayers;

  int m_NeuronsPerHiddenLyr;

  //storage for each layer of neurons including the output layer
  vector m_vecLayers;

public:

  CNeuralNet();

  //have a guess... ;0)
  void CreateNet();

  //gets the weights from the NN
  vector GetWeights()const;

  //returns the total number of weights in the net
  int GetNumberOfWeights()const;

  //replaces the weights with new ones
  void PutWeights(vector &weights);

  //calculates the outputs from a set of inputs
  vector Update(vector &inputs);

  //sigmoid response curve
  inline double Sigmoid(double activation, double response);
};

Most of this should be self explanatory. The main work is done by the method Update. Here we pass in our inputs to the neural network as a std::vector of doubles and retrieve the output as another std::vector of doubles. This is really the only method we use after the CNeuralNetwork class has been initialized. We can just treat it as a black box, feeding it data and retrieving the output as if by magic. Let's take a closer look at this method:

vector CNeuralNet::Update(vector &inputs){
  //stores the resultant outputs from each layer
  vector outputs;

  int cWeight = 0;

  //first check that we have the correct amount of inputs
  if (inputs.size() != m_NumInputs)
  {
    //just return an empty vector if incorrect.
    return outputs;
  }

  //For each layer....
  for (int i=0; i
  {
    if ( i > 0 )
    {
      inputs = outputs;
    }
    outputs.clear();

    cWeight = 0;

    //for each neuron sum the (inputs * corresponding weights).Throw
    //the total at our sigmoid function to get the output.
    for (int j=0; j
    {
      double netinput = 0;

      int NumInputs = m_vecLayers[i].m_vecNeurons[j].m_NumInputs;

      //for each weight
      for (int k=0; k
      {
        //sum the weights x inputs
        netinput += m_vecLayers[i].m_vecNeurons[j].m_vecWeight[k] *
                    inputs[cWeight++];
      }
      //add in the bias
      netinput += m_vecLayers[i].m_vecNeurons[j].m_vecWeight[NumInputs-1] *
                  CParams::dBias;

      //we can store the outputs from each layer as we generate them.
      //The combined activation is first filtered through the sigmoid
      //function
      outputs.push_back(Sigmoid(netinput, CParams::dActivationResponse));

      cWeight = 0;
    }
  }
  return outputs;
}

After this method has checked  the validity of the input vector it enters a loop which examines each layer in turn. For each layer, it steps through the neurons in that layer and sums all the inputs multiplied by the corresponding weights. The last weight added in for each neuron is the bias (remember the bias is simply a weight always tied to the value -1.0).  This value is then put through the sigmoid function to give that neurons output and then added to a vector which is fed back into the next iteration of the loop and so on until we have our output proper.

The other methods in CNeuralNet are used mainly by the genetic algorithm class to grab the weights from a network or to replace the weights of a network. 


1  2  3  4  5  7  8  Next  Home


The CGenAlg Class

This is the genetic algorithm class. If you followed my last tutorial you should have a good enough understanding of how they work. There is a difference with the CGenAlg class though because this time we are going to use vectors of real numbers instead of binary strings.

The neural network is encoded by reading all the weights from left to right and from the first hidden layer upwards and storing them in a vector. So if a network looked like this:


The vector would be:   0.3, -0.8, -0.2, 0.6, 0.1, -0.1, 0.4, 0.5

(note, this is not taking into account the bias, just the weights as shown)

We can now use crossover and mutation as normal with one difference: the mutation rate for genetic algorithms using real numbers is much higher… a value of between 0.05 and 0.2 is recommended.

Before I show you the definition of the CGenAlg class let me quickly show you the genome structure:

struct SGenome
{
  vector   vecWeights;

  double           dFitness;

  SGenome():dFitness(0){}

  SGenome( vector w, double f): vecWeights(w), dFitness(f){}

  //overload '<' used for sorting
  friend bool operator<(const SGenome& lhs, const SGenome& rhs)
  {
    return (lhs.dFitness < rhs.dFitness);
  }
};

And now the CGenAlg class:

class CGenAlg
{
private:
  //this holds the entire population of chromosomes
  vector <SGenomem_vecPop;

  //size of population
  int m_iPopSize;

  //amount of weights per chromo
  int m_iChromoLength;

  //total fitness of population
  double m_dTotalFitness;

  //best fitness this population
  double m_dBestFitness;

  //average fitness
  double m_dAverageFitness;

  //worst
  double m_dWorstFitness;

  //keeps track of the best genome
  int m_iFittestGenome;

  //probability that a chromosomes bits will mutate.
  //Try figures around 0.05 to 0.3 ish
  double m_dMutationRate;

  //probability of chromosomes crossing over bits
  //0.7 is pretty good
  double m_dCrossoverRate;

  //generation counter
  int m_cGeneration;

  void Crossover(const vector<double> &mum,
                 const vector<double> &dad,
                 vector<double>       &baby1,
                 vector<double>       &baby2);

  void Mutate(vector<double> &chromo);

  SGenome GetChromoRoulette();

  void GrabNBest(int             NBest,
                 const int       NumCopies,
                 vector<SGenome> &vecPop);

  void CalculateBestWorstAvTot();

  void Reset();

public:
  CGenAlg(int    popsize,
          double MutRat,
          double CrossRat,
          int    numweights);

  //this runs the GA for one generation.
  vector<SGenomeEpoch(vector<SGenome> &old_pop);

  //-------------------accessor methods
  vector<SGenomeGetChromos()const{return m_vecPop;}
  double AverageFitness()const{return m_dTotalFitness / m_iPopSize;}
  double BestFitness()const{return m_dBestFitness;}
};

When a CGenAlg object is created, the number of weights in each minesweeper's neural net is passed to it, along with the total population size. The constructor initializes the entire population with random weights and then each chromosome is allocated to its respective minesweepers 'brain' using the method CNeuralNet::PutWeights.

The minesweepers are then ready for action!


1  2  3  4  5  6  8  Next  Home


Putting it all together

I'm not going into a detailed description of the CMineSweeper and CController classes because they should be easily understood from the comments within the code. I will include them in the tutorial however if enough people pester me. I will describe the main loop though, just so you know exactly what's going on in there. I have omitted some lines that are included in the actual source for clarity. The missing code just deals with cosmetic stuff like updating the graph display and other stats.

bool CController::Update()
{
  //run the sweepers through CParams::iNumTicks amount of cycles. During
  //this loop each sweeper's NN is constantly updated with the appropriate
  //information from its surroundings. The output from the NN is obtained
  //and the sweeper is moved. If it encounters a mine its fitness is
  //updated appropriately,
  if (m_iTicks++ < CParams::iNumTicks)
  {
    for (int i=0; i
    {

      //update the NN and position
      if (!m_vecSweepers[i].Update(m_vecMines))
      {
        //error in processing the neural net
        MessageBox(m_hwndMain, "Wrong amount of NN inputs!", "Error", MB_OK);
        return false;
      }

      //see if it's found a mine
      int GrabHit = m_vecSweepers[i].CheckForMine(m_vecMines, CParams::dMineScale);

      if (GrabHit >= 0)
      {
        //we have discovered a mine so increase fitness
        m_vecSweepers[i].IncrementFitness();

       //mine found so replace the mine with another at a random
       //position
       m_vecMines[GrabHit] = SVector2D(RandFloat() * cxClient, RandFloat() * cyClient);
      }

      //update the fitness score
      m_vecThePopulation[i].dFitness = m_vecSweepers[i].Fitness();
    }
  }

This first part of the if statement runs all the minesweepers through one generation (one generation consists of CParams::iNumTicks amount of computer cycles) updating their neural nets and their positions accordingly. If a land-mine is found it is removed and that minesweeper's fitness score is increased by 1. The land-mine is then replaced by another at a randomly generated position.

  //Another generation has been completed.  //Time to run the GA and update the sweepers with their new NNs
  else
  {    //increment the generation counter
    ++m_iGenerations;

    //reset cycles
    m_iTicks = 0;

    //run the GA to create a new population
    m_vecThePopulation = m_pGA->Epoch(m_vecThePopulation);


    //insert the new (hopefully)improved brains back into the sweepers
    //and reset their positions etc
    for (int i=0; i
    {
      m_vecSweepers[i].PutWeights(m_vecThePopulation[i].vecWeights);

      m_vecSweepers[i].Reset();
    }
  }
  return true;
} 

The else statement kicks in at the end of every generation. It's this chunk of code which collates all the minesweepers chromosomes and fitness scores and sends the information to the genetic algorithm. The GA does its stuff, passes the new weights back which then get put into a new generation of minesweepers brains. Everything is reset and a new cycle is run as per the previous paragraph.

This Update function loops endlessly until you decide the minesweepers have evolved interesting enough behaviour. This usually takes around fifty generations.

Hitting the 'F' key when the program is running will put the program into accelerated time mode and you'll see a simple graph of the population's progress.


Stuff to Try

Evolve minesweepers that avoid the mines.

Evolve minesweepers that pick up the mines but avoid another type of object. (not as easy as you think)

When you've played around a little with the code the more observant of you will notice that the simple crossover operator used here is not very effective. Can you think why? Can you design a more effective crossover operator?

It's possible to design the neural networks in a way that uses far fewer inputs and hidden neurons. How small can you make a network and yet still evolve effective behavior?


And that’s all folks!

I thought I was never going to get to the end of this but here we are at last! If any of you do anything interesting with neural nets after you have read this tutorial I would love to be informed. Please feel free to use my code in your own projects but I’d appreciate it if you give me credit where due.

And most of all, have fun!

If you have enjoyed (or not!) the tutorial please take a moment to comment or ask questions on the message board. Getting feedback from you makes the effort seem all the more worthwhile.


1  2  3  4  5  6  7  Home


Labels: , , ,